Monday, March 31, 2008

Would have been useful last week


We found an ingenious invention called the Zip Wall. Jeff brought it home a few days ago, and we are kicking ourselves for not getting it sooner. You can seal off a doorway with plastic sheeting, say to keep 130 year old horsehair plaster dust from seeping into every room in your house, and it has a niftly little zipper attachment that turns a sheet of plastic into a tent-style zipper door flap so you can actually use the doorway when the dust settles.


It's a little pricey, but compared with the amount of dust everywhere in our house, it would have been very helpful to have this before we had the demolition derby in our kitchen last week.

Friday, March 28, 2008

Project Plan, Week 1


After the first 7 days, I think we are slightly ahead on the project. Not enough to move the dates, but enough that we are on-target. Having 6 people demo the kitchen really put us in front of the demo work, and we were able to get the Electrician and Plumber started a little early.

Shamefully, I admit to allowing some scope creep this early. The dreaded words "While we're at it..." were followed by "lets add a utility sink in the basement." This did make sense and we have wanted to add a sink in the basement for a while, so that's adding a day and $800 to the plumbing budget, but I know I will be grateful when we can rinse grimy hands or paint brushes in the basement rather than near the precious new countertops.

Wednesday, March 26, 2008

Found objects

When we pulled the phone outlet off the wall, we found a bit of old wallpaper.


Paul found this little tobacco tin in the ceiling. When I opened it, it still had some tobacco flakes in it and the paper that lined the tin. This is a J.G. Dill's Best Cube Cut Plug.


There's no date on it, but its a fun little memento to have regardless. I guess we need to think about what type of time capsule we want to leave behind for the next renovators.

Sunday, March 23, 2008

Homewreckers

Saturday morning at 9am, John and his son Zack arrived and started to sling sledgehammers shortly thereafter. We were joined by Deepak and Manjula around 10, and Paul came over around 11 to add another set of hands.

Being pregnant, I didn't do much hammer slinging, but tried to do clean up as the walls came tumbling down. At one point I just stood back and watched - feeling positive the backswing of a hammer was going to connect with some part of my body.

Here is a photo of the room and our friends when we took a break for lunch.


After burgers, steaktips, cheetos, and a cold drink, everyone got back to work. At 3pm, after 5 hours of work by 6 people, this was the state of the kitchen:


All walls taken down to the studs, ceiling removed, island destroyed and the room was clear of debris.

A big Thank You to everyone who helped us, there's no way we could have done this without you!! We will have you over for dinner as soon as the new kitchen is operable.


Tuesday, March 18, 2008

Kitchen - Before


Here's a photo of the current state of the kitchen. I used Autostitch to get the panoramic view from my flickr photos.
The room is pretty big, but when you look at the actual amount of counterspace, you realize how little there is.
We built the island when we moved in. the 7x3 foot island helped tremendously. We salvaged base cabinets from a friend doing a kitchen renovation, painted them bright red, and topped them with 4x4 tiles.

The layout won't change too much. We're going to switch the positions of the fridge and the stove, and the new island will be slightly larger. The sink will actually be centered under the window. The sofits will be removed and the new cabinets will go all the way to the ceiling. There will be countertop extended to the right of where the fridge is now. And, of course, the current florescent lighting will be replaced with recessed and pendants.

Here's the plan for the renovation. If everything goes according to plan, which we doubt it will, we should be finished around mid-May.

No turning back


The dumpster arrived this morning.

We're almost at the point of no return.

Saturday, March 15, 2008

Powder Room Disaster, Part 2

Pictures of the finished bathroom, before disaster struck


The sewer pipe from the 2nd floor bathroom had cracked somewhere between the basement and the floor of the guest bathroom, rendering the guest bath and the 2nd-floor washer-dryer useless. Jeff had to cut open the wall to expose the pipe so the plumber could replace it. Here's a close-up of the disgusting 4 foot crack in the cast iron pipe.

This is what the bathroom currently looks like with the replacement PVC pipe in place. When we have the plaster in to finish the kitchen wall, we'll have him fix this too. This picture does show off Jeff's tile work on the shower surround, and our friend David is peeking out of his picture on the lower-left.

Just when you think you have a project completed, this house always throws a curve at us.

Thursday, March 13, 2008

Powder Room, Part 1

Our downstairs bathroom just off the kitchen is actually a full bath, although we have never bathed in that shower. When we moved in, it was painted lavender topping cheerful yellow wall tiles and small wood tiles in a parquet design. The vanity was a square thing, painted many times and showing water damage near where the sides met the floor. The room is pretty small and the door didn't swing open all the way, but bumped into the vanity causing the occupant to squeeze around the commode to enter and exit the room.

We started the re-do last spring, and it took us much longer than we expected, due to some surprises along the way. Jeff chipped off all the yellow 4x4 wall tiles and found some kind of vinyl wall covering. Under that was bead board, nice old inch-thick boards covered in mold. Out they went. Under the bead board was the outside wall of the house. No insulation. In fact, if you bent down and looked up through the horizontal siding, you could see daylight streaming through. That explained why the bathroom was always so cold!

After adding insulation, Jeff put up cement backerboard and then surrounded the tub with white subway tiles. The rest of the room had been covered in white faux-wood wall panelling and painted, so that was replaced with beadboard.

We also added a small toilet, pedestal sink, bamboo flooring, we splurged a little on a bamboo-styled faucet to match the flooring. After consulting the Pottery Barn catalog for a pleasing Benjamin Moore paint sample (why reinvent the wheel?), the room was patched, plastered, and painted Silvery Blue (1647) and finally completed. A mere 8 months after we started.

To our credit, in addition to the doing all the demo and renovation ourselves, Jeff also moved the plumbing, rewired a light, and installed a water shutoff valve that didn't cause the entire house to be shut down. This was a little beyond the "update" we originally envisioned and morped into a true renovation.

Which is why the words "Honey, why is it raining in the basement?" brought that familiar sagging feeling when Jeff uttered the question 2 days before Christmas.

To be continued...

Sunday, March 9, 2008

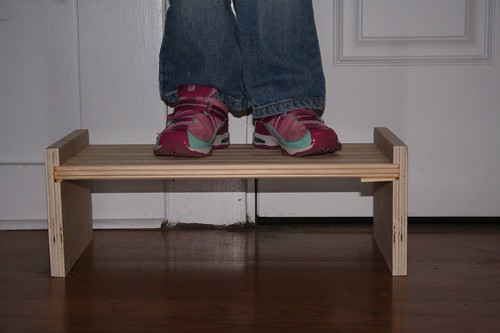
She Gets a Step Up


We are expecting Spawn#2 in mid July, so we had to do some furniture shuffling. Spawn#1 has been sleeping on a futon that we received for free from a former Co-Worker. We are not proud of the Futon part, but heck it was free. So Futon to BR#2 from BR#1, Bed from BR#2 to BR#3 and Bed from BR#3 to BR#1. Spawn#1 was very excited to to have a "Big Girl" bed.

This caused an issue. Spawn#1 couldn't get into the bed. After much debate with her, she decided and we agreed that she needed a step stool to get into that new "Big Girl" bed.

We hustled to the basement workshop to start the construction. In the scrape wood pile I found a 36" unpainted piece of beadboard, leftover from the Kitchen Bathroom remodel. She also discovered a piece of 3/4" that we had just enough to use that for the sides.

We donned our safety glasses and noise protection, setup the 3/4" straight edge bit into the router.. 1 run with the router across the top, chop into two 12" sections and we've got ourselves a step stool. Little glue and the Bessy Clamps to hold it over night. Spawn#1 is very excited and off to bed she goes, with me helping her in for the last time, sort of.

Saturday, March 8, 2008

Leaking Foundation Part 2


I had been checking on the leak over the past 3 weeks to see how successful I was. Everything was going well until today. We'd received about 4" of snow, followed by rain. This was the same recipe that caused me to discover the issue. My water bucket that I had placed under the "repair" was plus 2.5 gallons. I knew this was going to happen, I patched it while it was still dripping, not the best idea. However, at the time of this inspection no water was dripping. I've mix up another batch of quikrete to finish the job.

Wednesday, March 5, 2008

Let there be light

Jeff met with the electrician yesterday to confirm the scope of work regarding the lights and outlets. He seemed to agree with our plans so we're now another step closer to the start of the demolition.

As I mentioned before, our current lighting is made up of unflattering fluorescent tube lights, so we will be ripping those out. We plan to install 12 6-inch HALO IC recessed lights around the working and walking areas of the kitchen. These will be white, and will hopefully blend nicely into the ceiling.

The kitchen island will be lit by two 12-inch pendants that closely resemble this:


I originally saw these pendants in a magazine and fell in love with them. Much to my surprise, the first local lighting place I checked is able to order these for me and they are much cheaper than any prices I have found online. I haven't actually ordered them yet, but I feel good that I can get them. The manufacturer is Hudson Valley and this is the Haverhill model.

I have backed off the idea of using chrome finished accessories, and am back to polished nickel, so the pendant hardware will be polished nickel. As will the sink faucet, knobs, pulls, and latches. All of which I have yet to pick out.

We are also going to do some sort of under-cabinet lighting, and as the upper-upper cabinets will have little glass-front doors, we need to find accent lighting for that. I plan to spend some quality time at the lighting place this weekend to get it sorted out.

Monday, March 3, 2008

Kitchen Renovation

I have alluded a little to the kitchen renovation/gut-remodel we are planning, and thought I'd shed a little more light on it. I plan to post frequently about the progress we're making as the project gets underway.

Our kitchen needs a full gut. Its a working kitchen right now, but is very out of date. One or more of the previous owners maintained the kitchen, but we suspect they took the cheapest possible route to keeping it working.
Here are my list of gripes about the kitchen, in order of greatest annoyance. (If you click into the picture, you can see my notes about the problem areas)

1. Its seems to be lacking any type of insulation. This room is the coldest room in the house. Every morning, the kitchen is consistently 6-8 degrees colder than the rest of our house. Since Jeff insists on the "just wear a hat and sweater" philosophy of keeping warm, the kitchen can often be 58 degrees in the morning after a cold winter's night. The plus side: no need to clutter up the freezer with frosty mugs, we keep beer mugs cold right in the cabinets.


2. Old cabinets. These cabinets were built into the kitchen directly and have no backs. Along the line, someone retrofitted them with European-style hinges and now they open in a crooked manner with some shoving to get them to close again.

Lower Cabinets

3. Countertops. These countertops are a green laminate that matched the paint on the walls when we bought the house. The laminate isn't the problem so much as the fact that the countertops are about 1.5 inches higher than normal. I suspect a previous owner just glued the laminate on top of the old countertop for an updated look. Perhaps I am just disgruntled that I am short, but I really resent the added 1.5 inches of height in the countertops. I'm not sure there is a bright side to the countertops.


Countertops

4. Wood paneling. One would imagine that any wood trim in the house would be vintage beadboard. Thankfully we will not have to salvage any beadboard because the faux wainscotting in this house is the cheesy wood-paneling from the 70s that has been painted white. My apartment in college had this type of paneling, but at least it was exposed in all its faux-bois glory. Our paneling has been painted so many times I'm not sure it could look worse.

5. Lighting. Our kitchen has the worst lighting in the world. Flourescent tube lighting. Hideous lighting that makes the kitchen feel as if you are in poor-office-lighting-hell. We even sprung for the daylight bulbs, but it hasn't helped. I think if I was forced to change only 1 thing in the kitchen, I would say the hell with insulation or new cabinets, just give me flattering lighting!

So, with these issues bothering us for the 3+ years we've lived here, its finally time to redo the kitchen. We have been planning for about 4 months now, and have had the help and guidance of a Renovation Consultant who lives next door, lucky for us. The demo starts in 3 weeks, and we are optimistic that the project will be finished in 10 weeks after that. We'll see how it goes.

LinkWithin

Related Posts with Thumbnails